
1How EstiMate works
People are unreliable at predicting hours, but very good at comparing two tasks and saying which is more complex. EstiMate builds on that strength with a two-step method:
- Rate relative complexity. Two to four estimators independently rate every work package of a project on an eight-level complexity scale. No hours are involved, and nobody sees the ratings of the others.
- Anchor to real hours. Each estimator picks their most complex work package rated Overseeable and estimates its implementation hours. That single number converts complexity points into hours.
A project manager or team lead then compares all ratings side by side, decides a final complexity per work package and sets the hour anchor for the project. EstiMate calculates the total, including testing and documentation.
The complexity scale
Each level is worth roughly twice the previous one. A project keeps the scale it was created with, so a later change to the scale never changes its hours.
| Complexity | Points | When to choose it |
|---|---|---|
| Trivial | 1 | Requires no real effort. |
| Easy Peasy | 2 | Barely anything is required for this. |
| Configuration | 5 | For complex configurations choose another more appropriate complexity. |
| Pluggable part | 10 | Most common for using existing software modules, drivers and plugins. |
| Overseeable Anchor level | 20 | You have a fairly good idea how to implement and test this. |
| Complex | 40 | Some ideas how to implement, but further research required. |
| Very Complex | 80 | You know what it is about, but a lot of research and testing is required. |
| Near impossible | 160 | You have absolutely no clue how to deal with this. |
2Getting started
Register your company
Everything in EstiMate belongs to a company. The person who registers the company becomes its company owner.
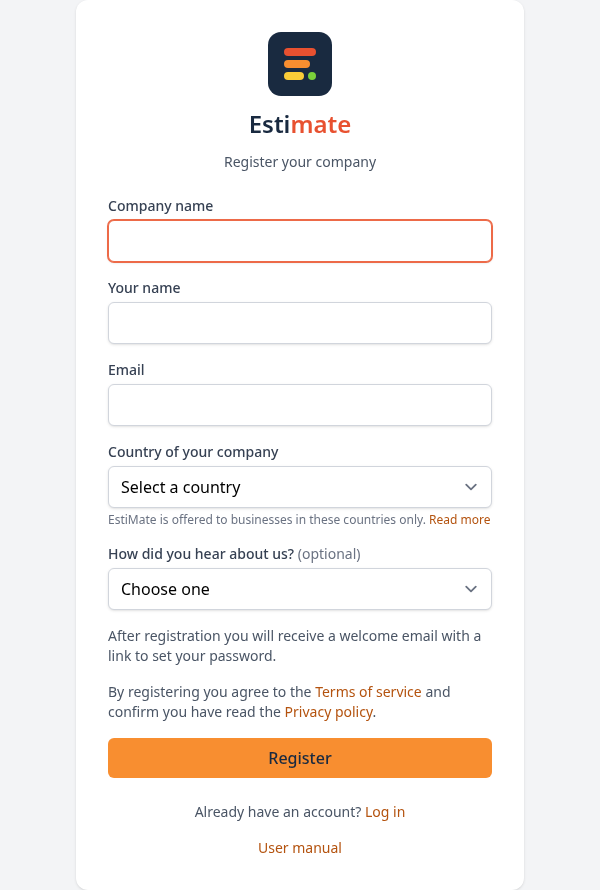
- Click Register in the top menu.
- Enter your company name, your own name, your email address and the country of your company. EstiMate is offered to businesses in the Netherlands, United Kingdom, Ireland, New Zealand, Australia and South Africa. If you like, tell us how you heard about EstiMate. Tick the box to accept the terms of service and the data processing agreement, which confirms that you have read the privacy policy. Click Register.
- Open the welcome email and use its link to set your password.
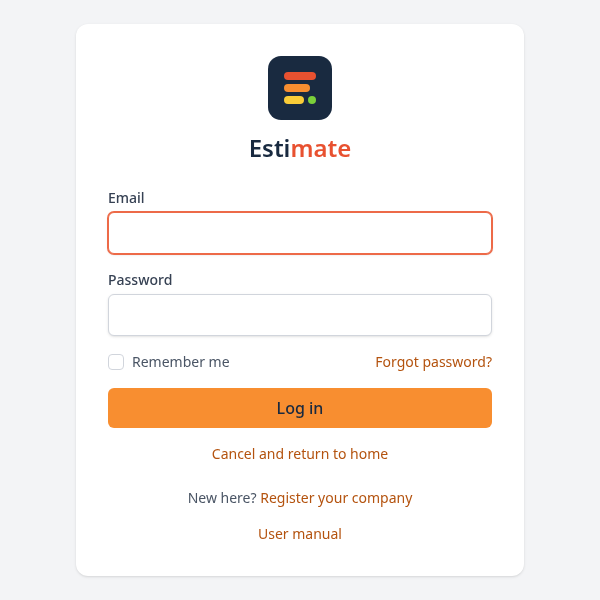
- Log in with your email address and new password.
Registration is free and asks for no payment details. Your first project estimation is free as well. EstiMate is offered to businesses only; see the legal notice for who is behind EstiMate.
In the weeks after you register, the company owner receives a few short getting-started emails, such as how to invite estimators or when your estimates are ready to review. Each email is only sent when that step is still open, and each has an unsubscribe link. Emails about your account, such as invitations and billing, are not affected.
Forgot your password?
Click Forgot password? on the login page and enter your email address. You receive a link to choose a new password.
3Roles and permissions
Every user has one role. The role decides which menu items they see and what they can do.
- Company owner
- Registered the company. Manages users, billing and every project of the company.
- Admin
- Manages users and every project of the company. Has no access to billing.
- Project manager
- Creates projects and runs the estimation of the projects they manage or lead.
- Team lead
- Runs the estimation of the projects they are assigned to as team lead. Cannot create projects.
- Estimator
- Rates the work packages of the projects they are invited to. Has no access to project settings or the review.
- AI connection (MCP) AI
- An AI assistant that a user connected. It acts as that user, with the same project rights, and never more. Estimators cannot connect one.
| Action | Company owner | Admin | Project manager | Team lead | Estimator | AI connection |
|---|---|---|---|---|---|---|
| Estimate when invited | ✓ | ✓ | ✓ | ✓ | ✓ | As the AI user |
| Create projects | ✓ | ✓ | ✓ | – | – | Like the user |
| Manage work packages, invitations and the review | ✓ | ✓ | Own projects | Own projects | – | Like the user |
| Write AI reports, once turned on for the company | ✓ | ✓ | Own projects | Own projects | – | – |
| Re-open or change a completed estimation, close invitations and finalize the estimation | ✓ | ✓ | Own projects | Own projects | – | Like the user |
| Delete projects | ✓ | ✓ | – | – | – | – |
| Manage users | ✓ | ✓ | – | – | – | – |
| Billing and payments | ✓ | – | – | – | – | – |
| Set up AI connections | ✓ | ✓ | ✓ | ✓ | – | – |
- “Own projects” are the projects where the user is the project manager or the team lead. Anyone in the company can be invited as an estimator, whatever their role.
- “Like the user” means the AI connection has exactly the rights of the user who connected it. A team lead's assistant, for example, can only manage the team lead's own projects.
- An AI connection never estimates on behalf of a person. It can only estimate as your company's separate AI user, an extra voice next to the human estimators. See AI connections.
- When an estimation needs a payment, the assistant gives you a link; a person completes the payment in the browser.
4Managing your team
The company owner and admins manage the users of the company under Users in the menu. Add everybody who manages projects or estimates them.
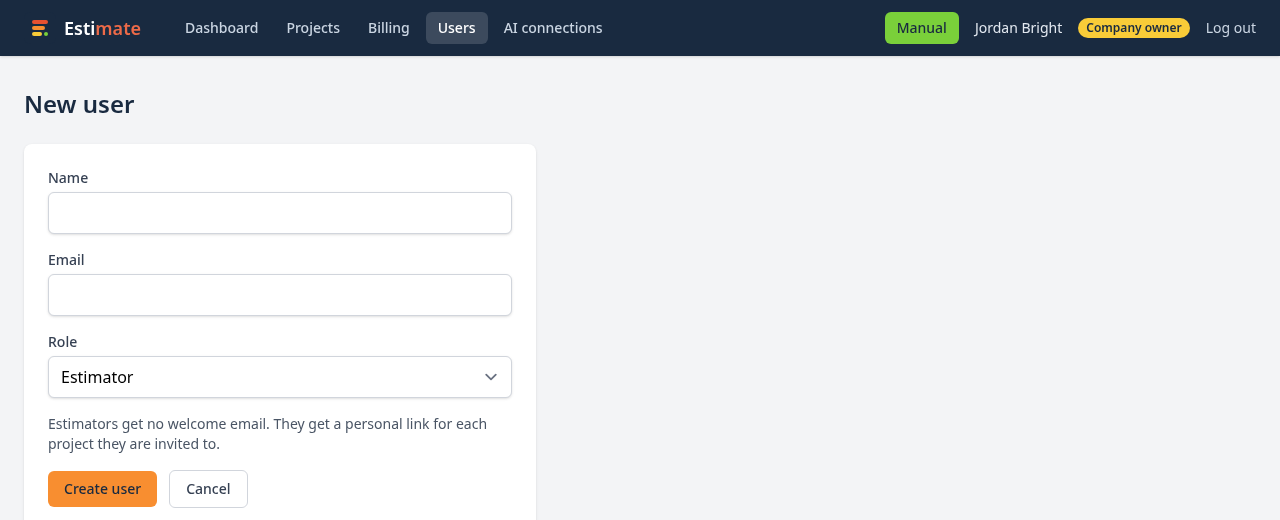
- Click New user.
- Enter their name and email address and choose a role.
- Click Create user. They receive a welcome email with a link to set their password. Estimators get no welcome email: they receive a personal link for each project they are invited to. If you later give an estimator another role, they get the welcome email then.
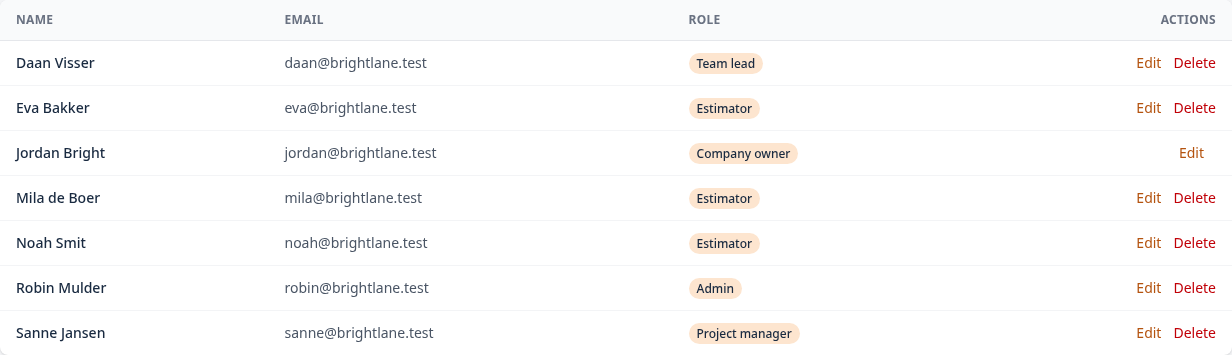
Use Edit to change a name, email address, role or password, and Delete to remove a user. The company owner can only be edited by themselves and cannot be deleted.
Support access
Sometimes EstiMate support can help you faster when they see what you see. The company owner and admins can allow this on the Users page. Support may also ask for it: you then get an email explaining why, with a link to that page. Nothing changes until you allow access.
- Click Allow support access. EstiMate support can now log in as the users of your company for 24 hours.
- When you are helped, click Turn off support access. Otherwise it ends by itself after 24 hours.

Written AI reports
EstiMate can let AI write a readable report that explains an estimate (see Review and the final estimate). To write the text, the work packages, ratings and explanations of that project are sent to our AI provider, Anthropic. Estimator names and your company name are not sent. Because this data leaves EstiMate, the feature is off until the company owner or an admin turns it on. If we move to another AI provider, it is turned off again until you agree to the new provider.
- On the Users page, click Turn on AI reports. The page shows who turned it on and when.
- To stop, click Turn off AI reports. Reports that were already written stay available.
Suspended company or blocked account
If your company account is suspended, a notice is shown at the top of every page. You can still log in, view your projects, export results and use billing, but you cannot create projects, invite estimators or estimate until the account is active again. Estimators who open their invitation link see that estimating is paused.
A blocked user cannot log in, connect AI assistants or estimate. In both cases, contact EstiMate support.
5The dashboard
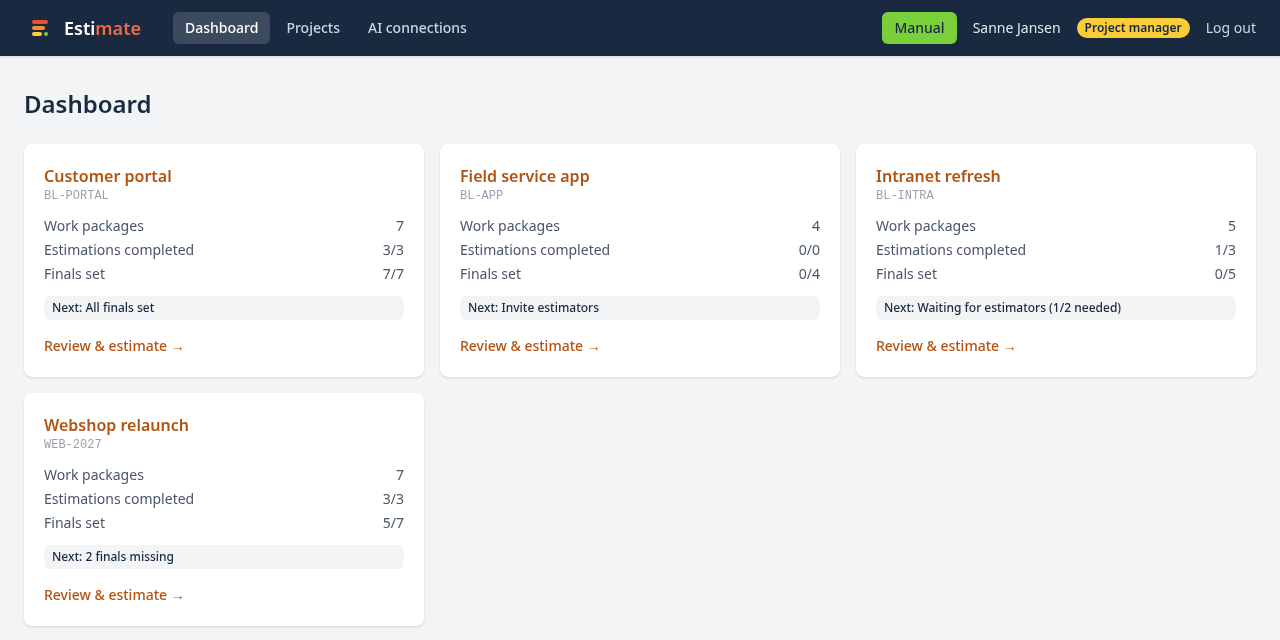
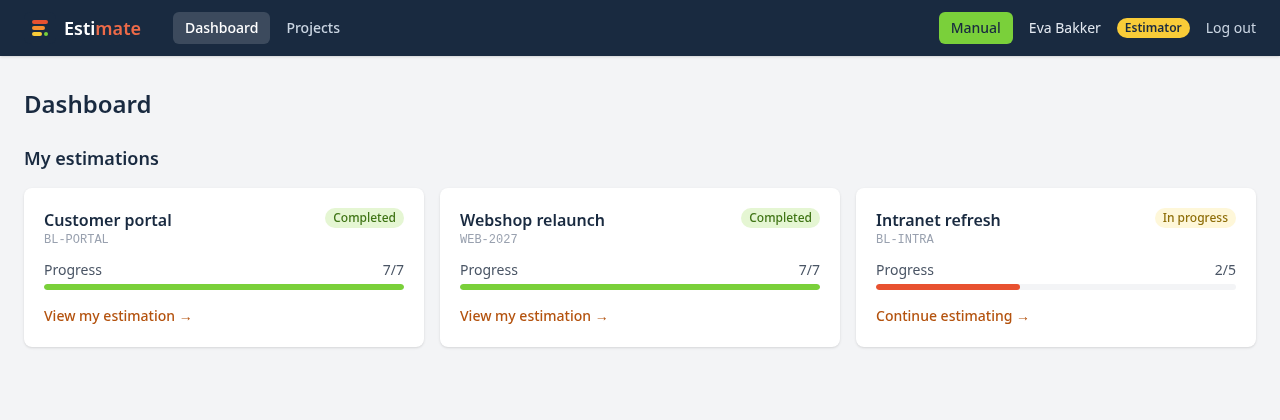
After logging in you land on the dashboard. It shows what needs your attention.
- My projects shows a card per project you manage, with the number of work packages, completed estimations and final complexities. The Next line tells you what to do next, such as Invite estimators or 3 finals missing. Only human estimators count toward the two completed estimations; the AI user does not.
- My estimations appears when you are invited to estimate. It shows your progress and a link to continue.
6Projects and work packages
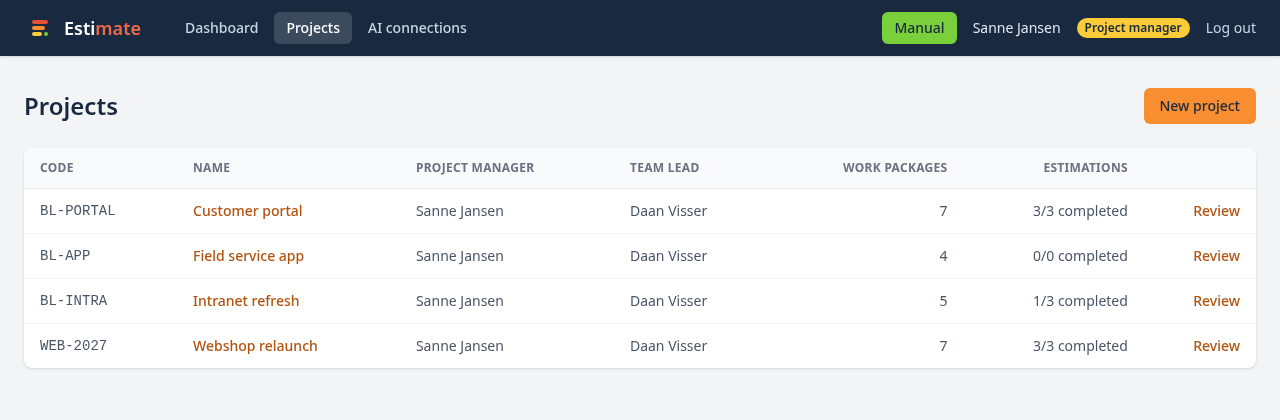
Projects in the menu lists every project you can see, with its project manager and team lead.
Create a project
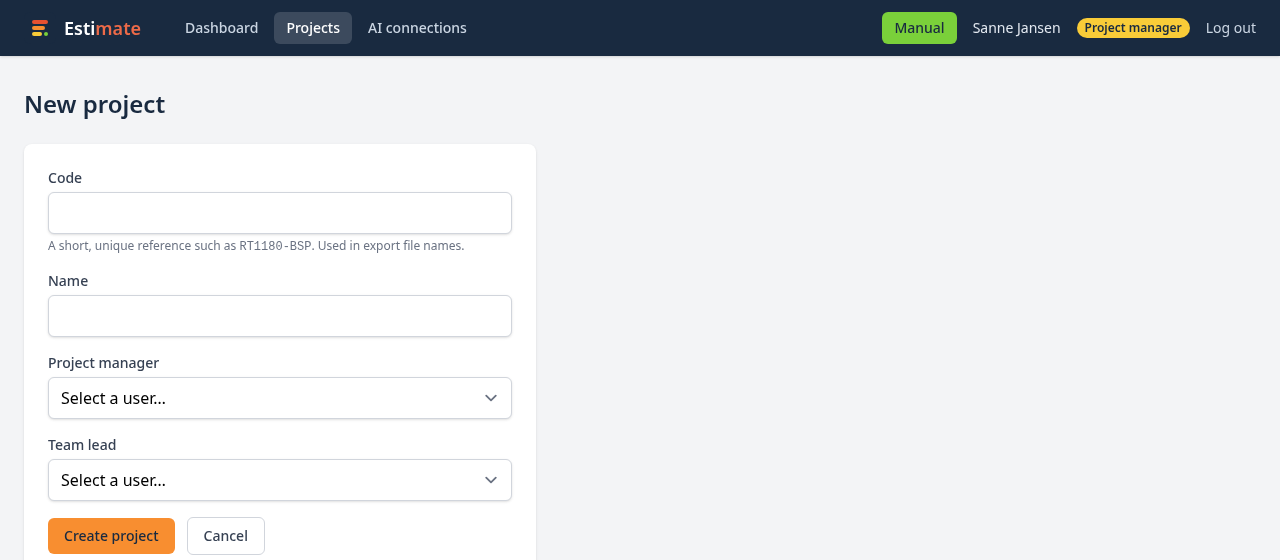
- Click New project.
- Enter a short, unique code, such as
WEB-2027. It is used in the names of exported files. - Enter the project name and choose the project manager and team lead.
- Click Create project.
Write a project brief
The brief tells the team and the estimators what the project is about and what it must achieve. Click + Add brief on the project page and fill in the parts that apply:
- Goal: the problem the project solves and what success looks like.
- Context: who uses it, which existing systems it touches, and the tech stack if it is decided.
- Scope: what is explicitly in, and what is explicitly out.
- Constraints and assumptions: the quality level (prototype or production), security or compliance needs, hosting, deadlines, and what estimators may assume.
Keep each part to about 100 words; the form counts them for you. Estimators see the brief at the top of their estimation page, and reviewers on the review page. The AI report and the AI user read it too.

Add work packages
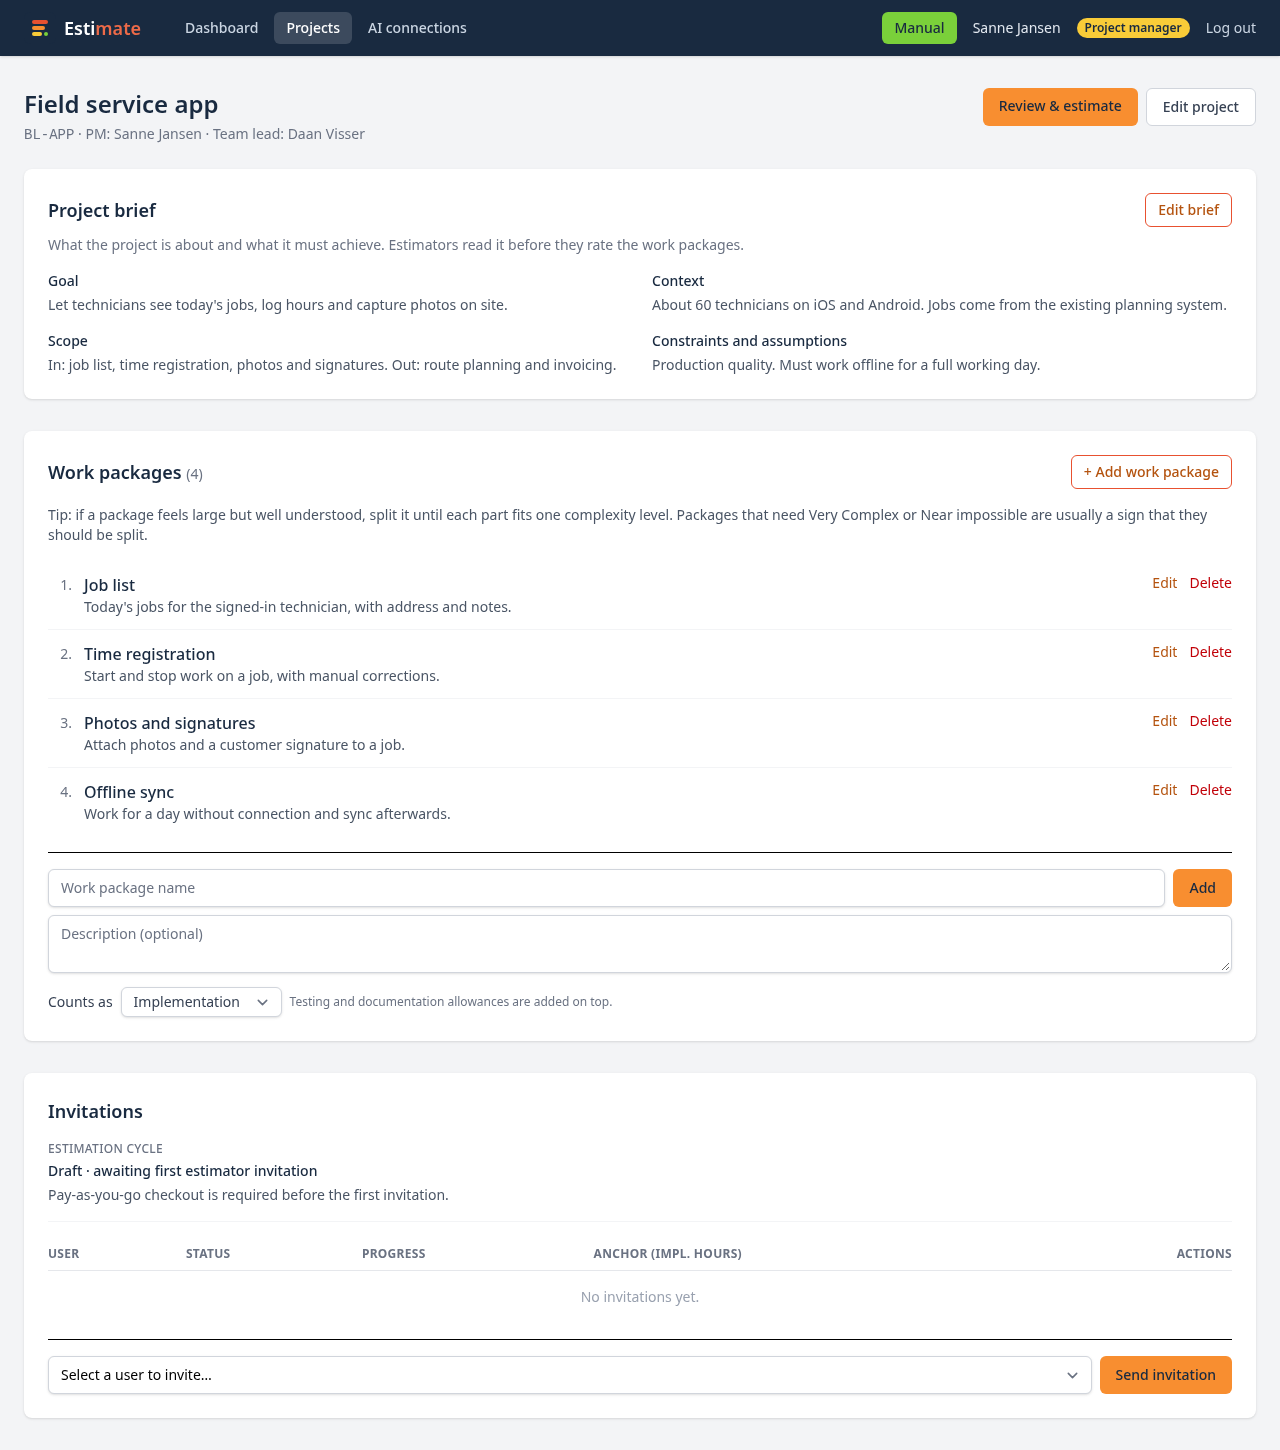
A work package is a piece of functionality that can be estimated on its own. Enter a name and a description and click Add. Use Edit and Delete to change the list.
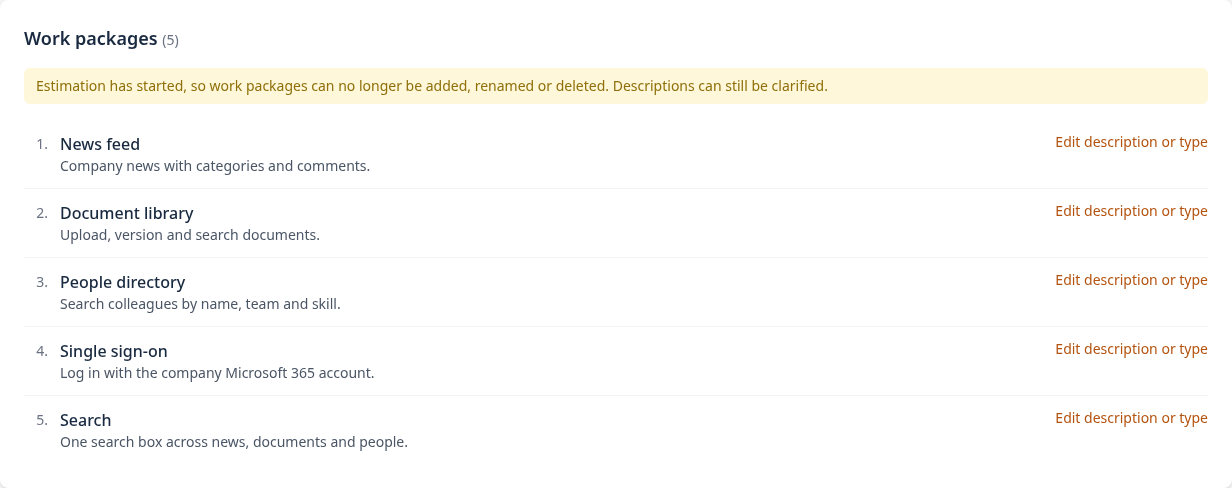
The scope locks when estimation starts
As soon as you invite the first estimator, work packages can no longer be added, renamed or deleted, and the project brief can no longer change. You can still clarify work package descriptions, but don't change what a work package covers: estimators may already have rated it.
Edit or delete a project
Edit project changes the code, name, project manager and team lead. The company owner and admins also see a Delete project button there. Deleting removes the project with all its work packages, invitations and estimations, and cannot be undone.
Export a project as PDF
Export PDF on the project page downloads the project name, project manager, development lead, project brief and work packages with their descriptions. It contains no estimations, so you can share it with a client or a new team member at any stage.
7Inviting estimators
Invite the estimators at the bottom of the project page: choose a user and click Send invitation. The estimator receives an email with a personal link.
- A project has a maximum of four estimators.
- At least two estimators must complete their estimation before you can set final complexities.
- Working alone? Invite a colleague, a partner or the client's technical contact as the second estimator. The AI user gives an extra independent opinion, but does not count as one of the two and cannot replace the second person.
- The first invitation starts the estimation cycle: the project changes from Draft to Active and the scope locks. If the estimation is not free or covered by a subscription, you are asked to pay first. See Billing.
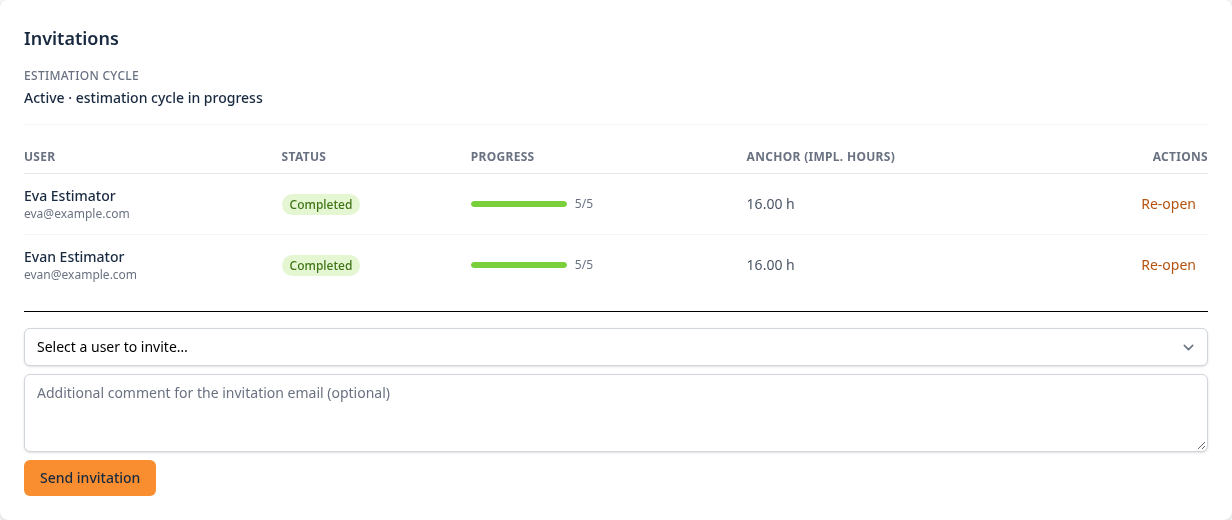
The status of an invitation is one of:
- Not opened yet the estimator has not opened their link.
- In progress the estimator is rating work packages.
- Completed the estimator rated everything and entered their anchor hours.
- Closed the invitation was closed before the estimator completed.
Resend sends the invitation email again. Close ends an invitation of someone who will not finish: they can no longer estimate and their ratings so far are not used. You need this to finalize the estimation while an invitation is still open. Delete removes an invitation that is not completed yet, for example when someone is not able to take part.
Correcting a completed estimation
Until the estimation is finalized, the company owner, the project manager and the team lead can correct a completed estimation in two ways. Both need a reason, both notify the estimator by email and both are logged.
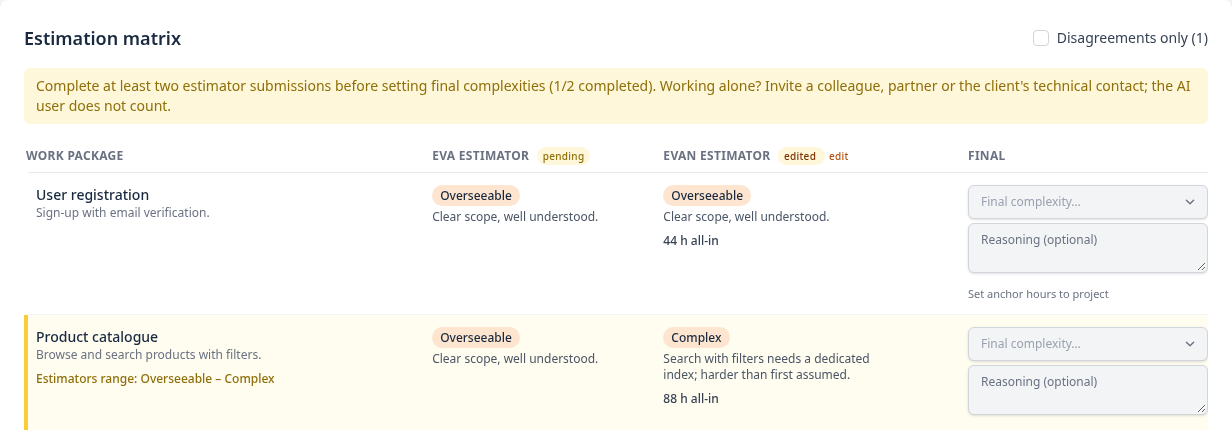
- Re-open (invitations table) hands the estimation back. The estimator keeps their earlier ratings, sees your reason on their page and completes the estimation again. Until then they show as pending in the review.
- edit (next to the estimator's name in the review) lets you change the ratings, reasoning, anchor work package and anchor hours yourself. The estimation stays completed and the review marks it as edited.
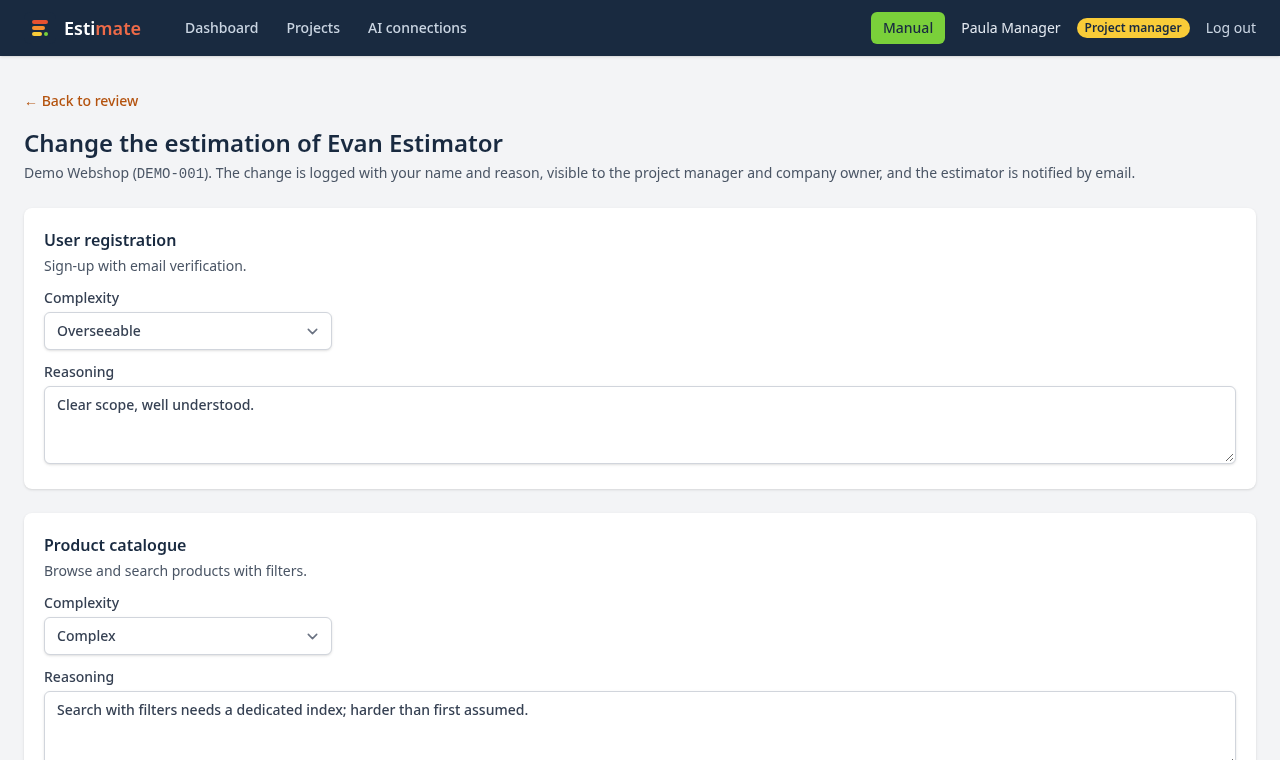
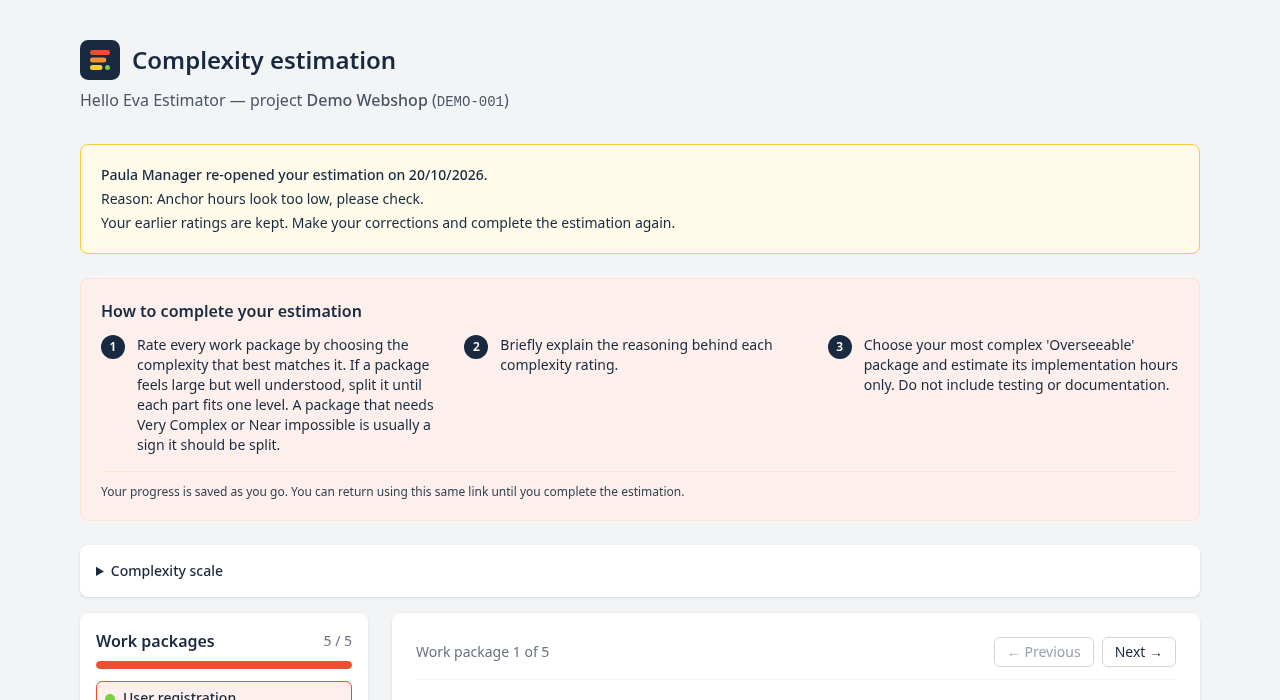
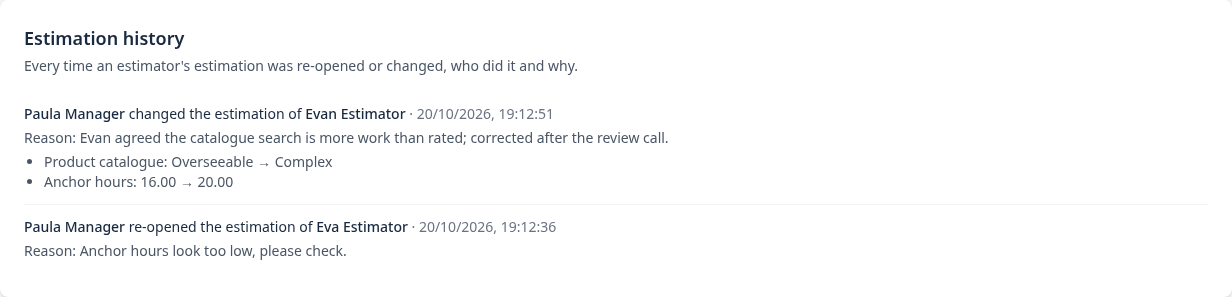
The Estimation history at the bottom of the project page lists who re-opened or changed which estimation, when, why and what changed. Only the owner, project manager and team lead see it. You cannot re-open or edit your own estimation, and once the estimation is finalized nothing can be changed anymore.
8Estimating a project
This chapter is for estimators. Open the link in your invitation email, or click Continue estimating on your dashboard. You don't need to log in. If the project has a brief, read it first: it is open at the top of the page until you save your first rating, and you can open it again at any time.
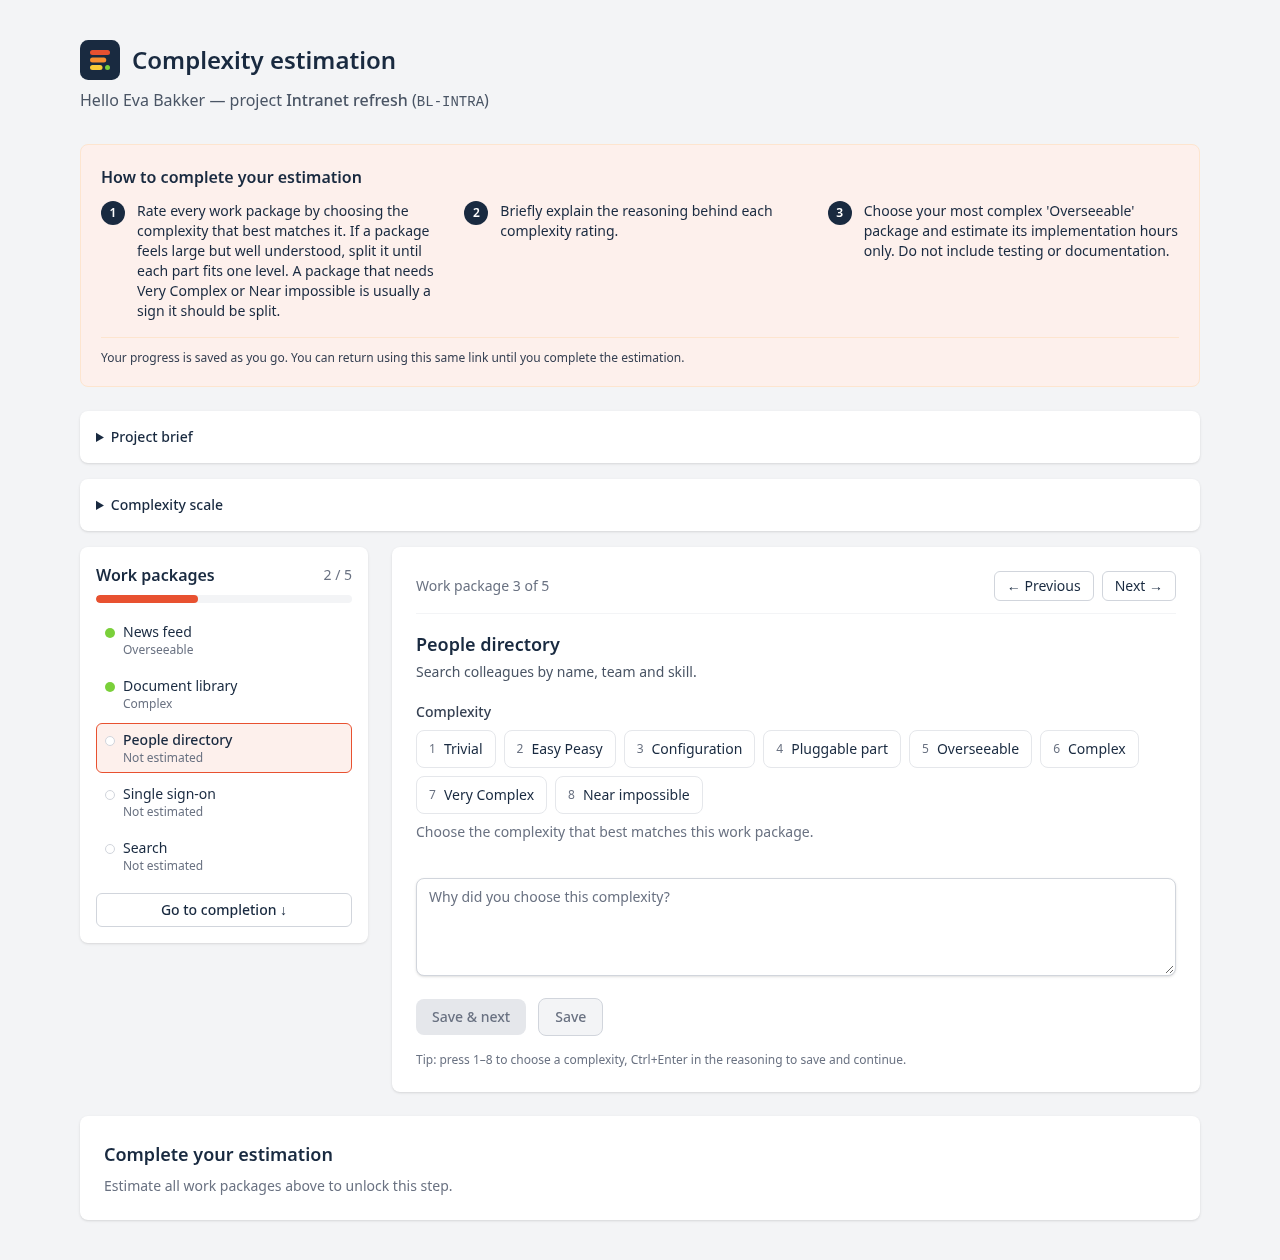
- Rate every work package. If a work package feels large but well understood, split it in your mind until each part fits one level; a rating of Very Complex or Near impossible is a signal that it should be split. Pick a work package from the list on the left, or step through them with Previous and Next. Read its description and choose the complexity that matches it best. Point at an option to see when to choose it, or press the keys 1 to 8. The Complexity scale above the list describes every level. From nine work packages on, the list has a search box and an Only show open option.
- Explain your rating in a sentence or two, and click Save & next (or press Ctrl+Enter, Cmd+Enter on a Mac) to continue with the next open work package. The reviewer reads your reasoning when ratings differ. A Saved label confirms it is stored.
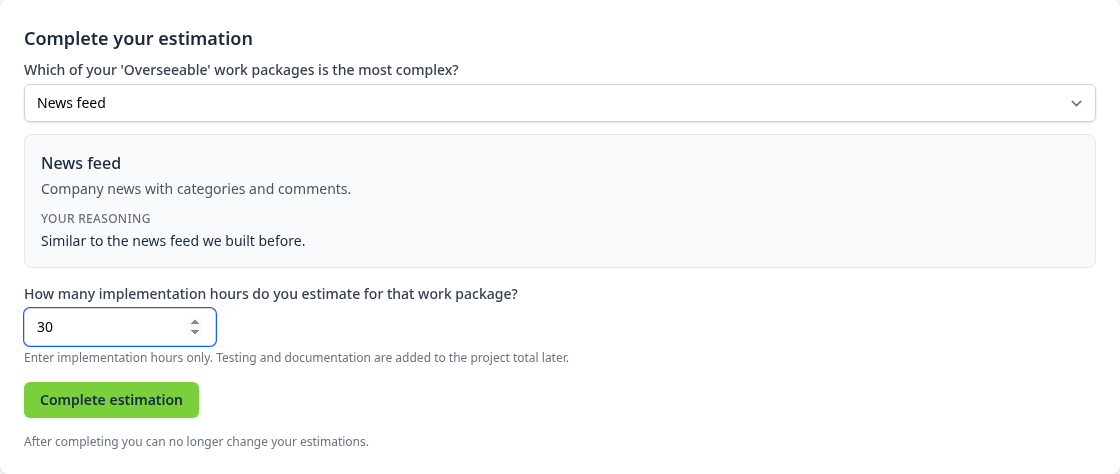
- Enter your hour anchor. When everything is rated, choose your most complex work package rated Overseeable. Its description and your reasoning appear below the choice, so you can judge the hours against them. Enter how many hours it takes to implement it.
- Click Complete estimation.
- The dot in front of each work package shows its status: rated, unsaved changes, not rated yet.
- Go to completion below the list takes you straight to the last step.
- Your progress is saved per work package. You can close the page and come back with the same link.
- Text you typed but did not save stays on the page while you switch work packages, and is marked Unsaved changes in the list.
- You need at least one work package rated Overseeable to complete your estimation.
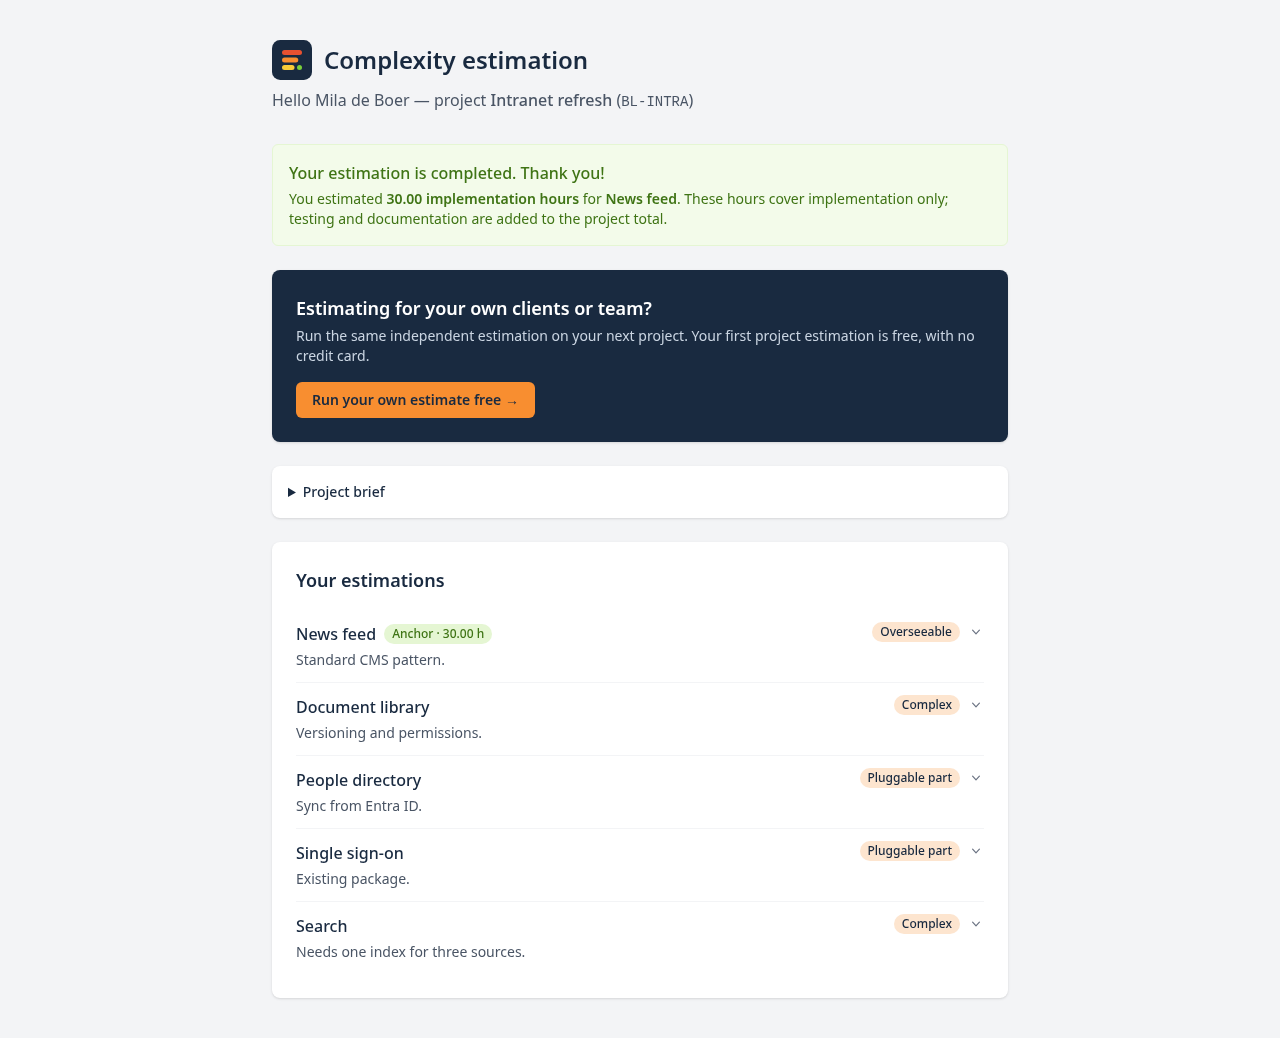
- After completing, you can no longer change your ratings. You can still open the link to see what you entered.
9Review and the final estimate
The project manager and team lead turn the ratings into a final estimate. Click Review & estimate on the project page or the dashboard.
If the project has a brief, open Project brief on the review page to check what the estimators were told. When ratings differ, the cause is often an assumption the brief leaves open.
The summary
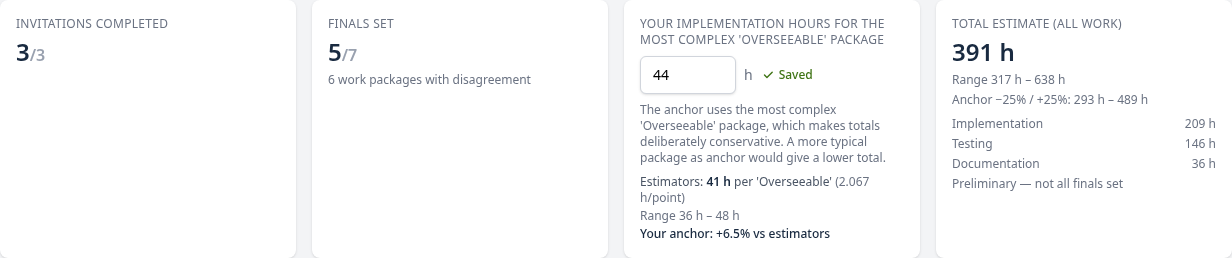
- Invitations completed and Finals set show how far the review is.
- Your implementation hours is the hour anchor of the project: the implementation hours of the most complex Overseeable work package. Below it you see the average and range of the estimators' anchors, to help you decide. The note under the field is a reminder that this choice makes the totals deliberately conservative: a more typical package as anchor would give a lower total.
- Total estimate shows the calculated hours, split into implementation, testing and documentation. It says Preliminary until every work package has a final complexity. The line Anchor −25% / +25% shows the total if your anchor hours were a quarter lower or higher, so you can see how much the total depends on that one number.
Hour anchors
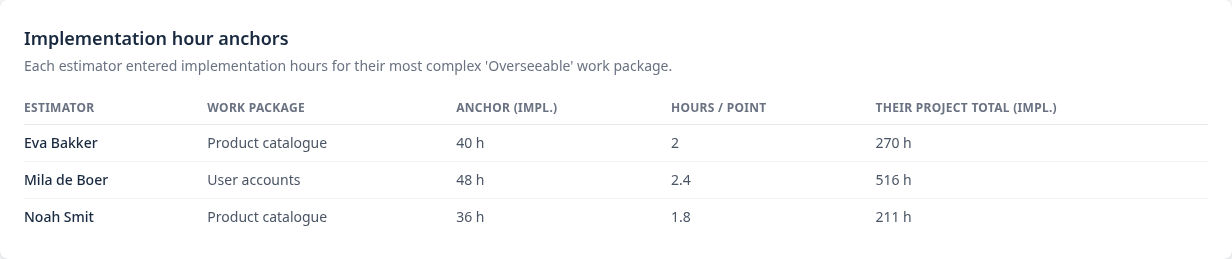
This table lists the anchor of every estimator who completed, the hours per point it gives, and the project total that follows from their own ratings. Large differences are worth discussing with the team.
The estimation matrix
The matrix shows every work package with the rating, reasoning and all-in hours of each estimator. Work packages where the estimators disagree are marked with a yellow bar and their range. Tick Disagreements only to focus on them.
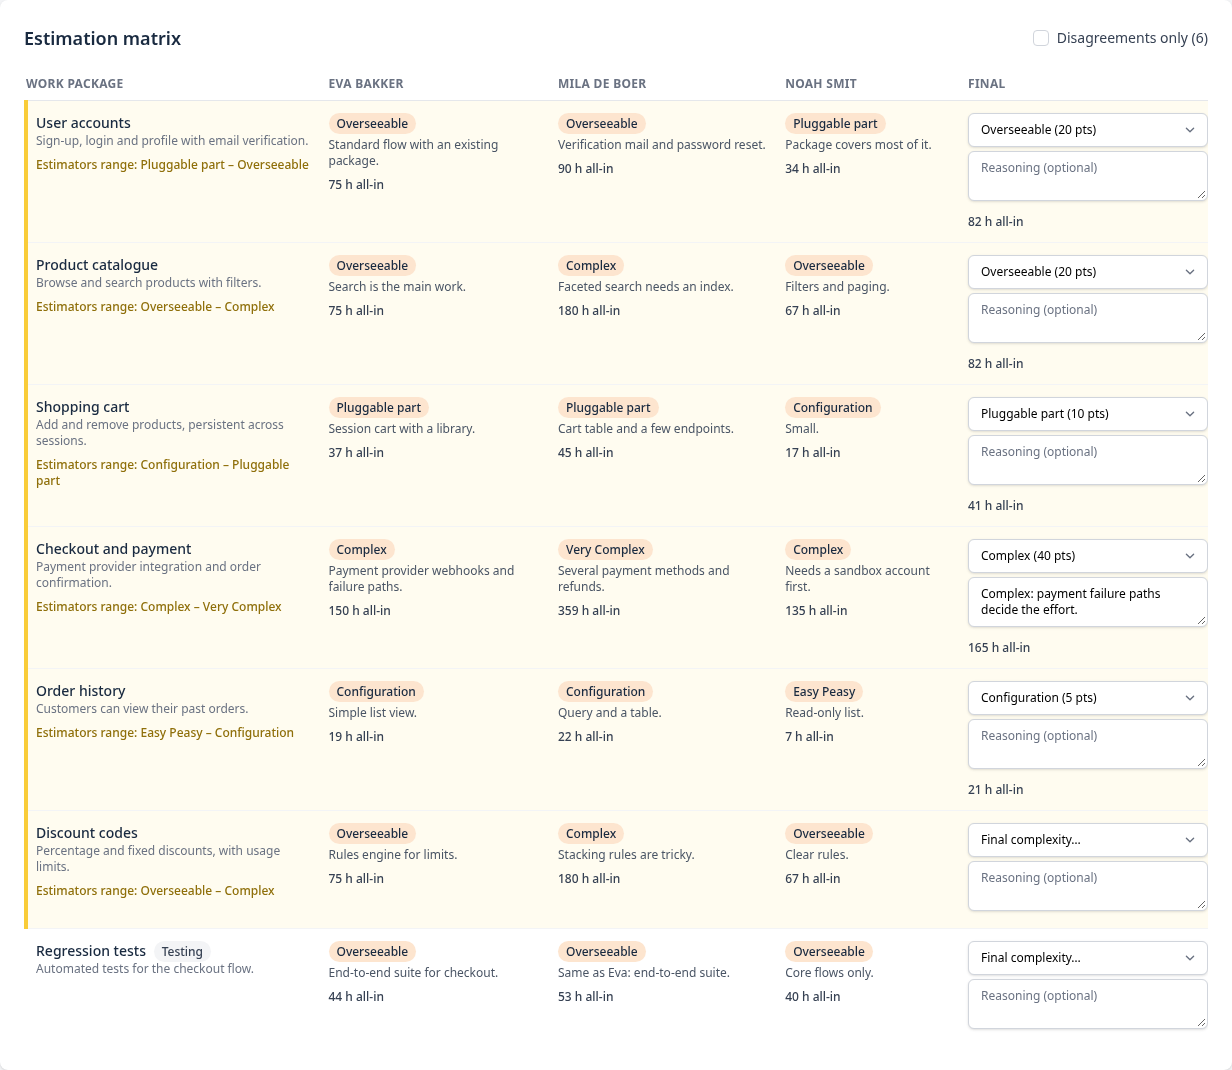
- Choose a final complexity in the last column, and add your reasoning if you like.
- Repeat for the other work packages. A bar at the bottom shows how many changes are not saved yet.
- Click Save all.
Final complexities can be set once at least two estimators have completed. If a final differs from every estimator, the matrix points that out, so you can double-check it.
Finalize the estimation
When the review is done, click Finalize estimation on the review page and confirm. Estimators can then no longer change their ratings, no one can be invited, and the anchor hours, final complexities, allowances and work package types are fixed. This cannot be undone. You can finalize once at least two estimators have completed, every other invitation is completed or closed, your anchor hours are set and every work package has a final complexity; otherwise the page says what is missing.

Export the results
- Export full estimation (Excel) contains every rating, reasoning and anchor, plus the actual hours if you recorded them, for your own analysis.
- Export final report (PDF) contains the final complexities and the calculated hours, ready to share.
Share with your client
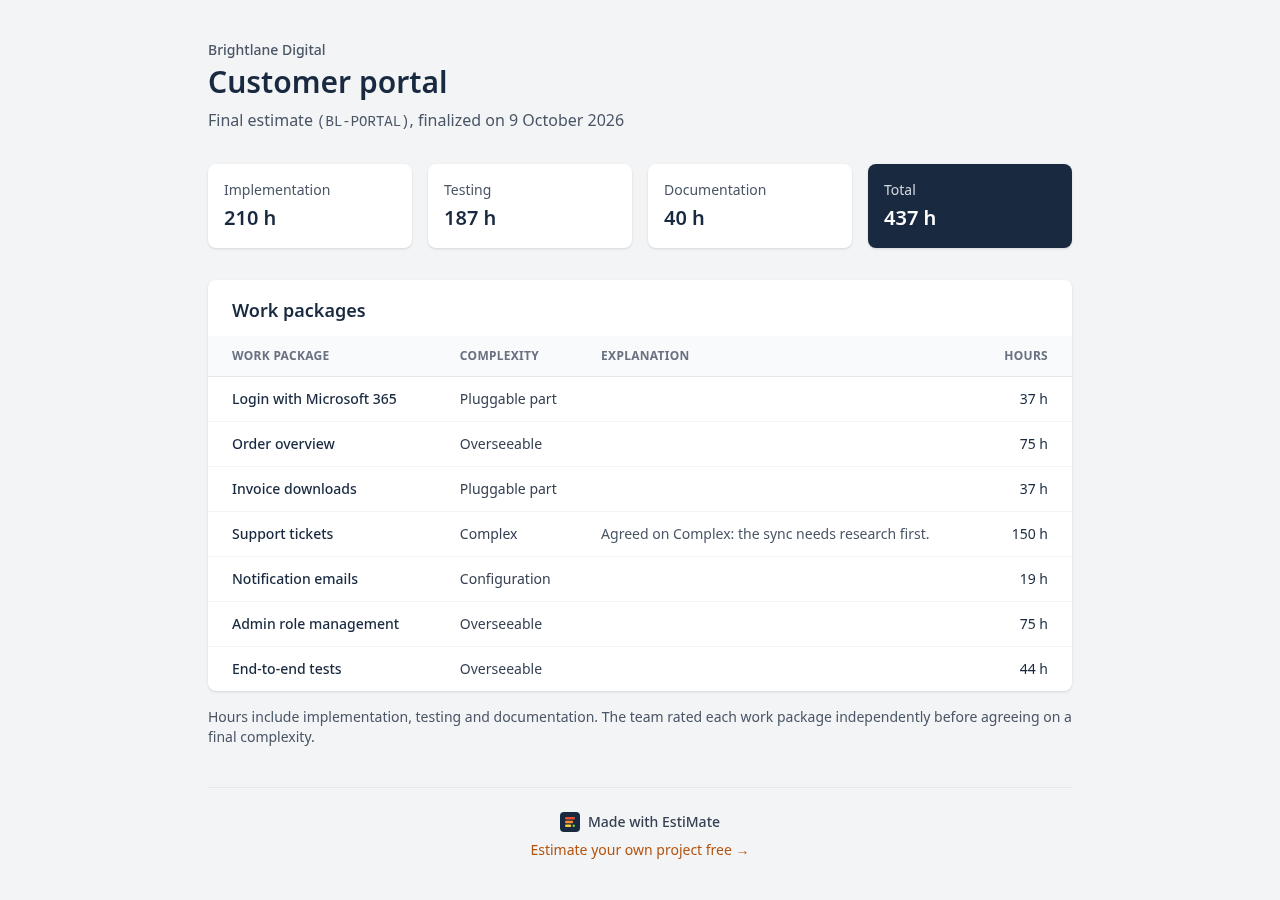
Once the estimation is finalized, you can give your client a link to a read-only page with the final estimate. It shows the same as the final report: work packages, final complexities, explanations and hours. It never shows individual ratings or who estimated.
- On the review page, click Create client link under Share with your client.
- Click Copy link and send it to your client. They don't need an account.
- The link works for 30 days. Click Extend by 30 days to keep the same link working longer, or Turn off link to stop it at once. Sharing again after that creates a new link.
The page always shows the current final estimate, so a final complexity or anchor hours you change later appear there too.

Record the actual hours
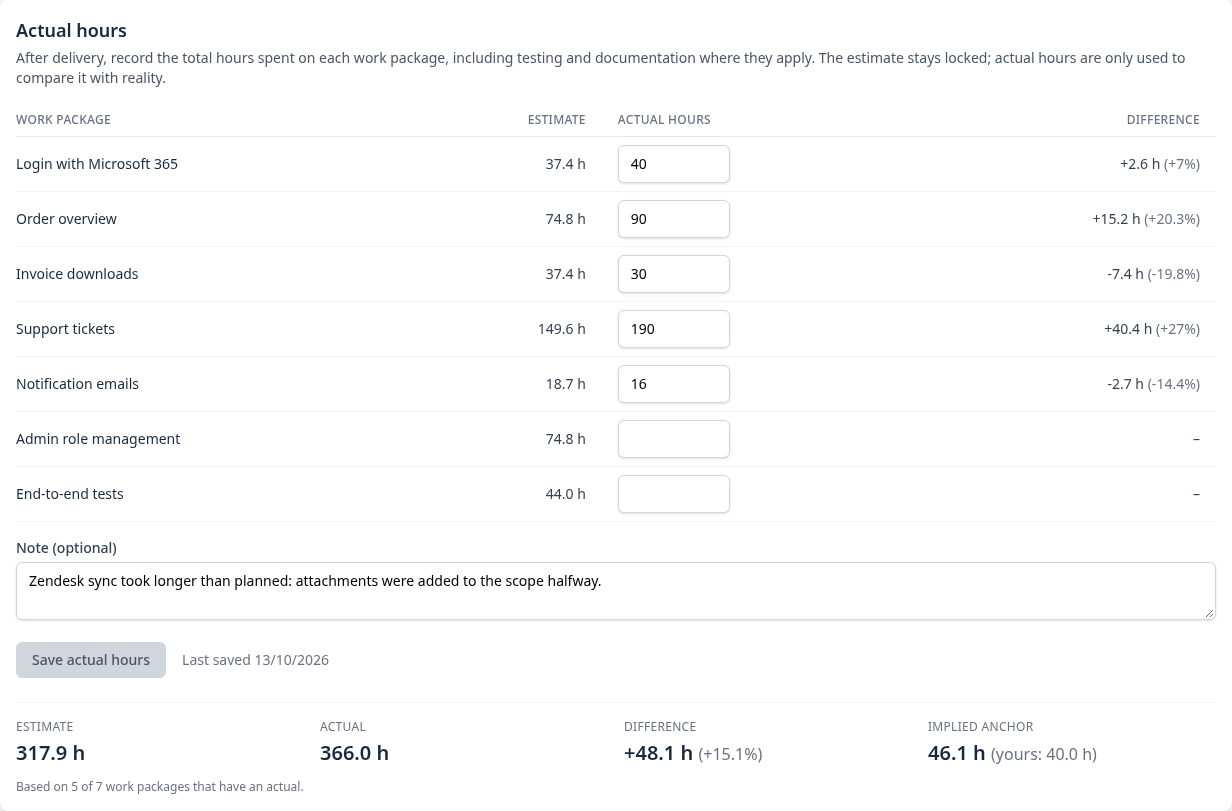
After delivery, you can record how many hours were actually spent, to see how the estimate compares with reality. This is only possible once the estimation is finalized, and it never changes the estimate itself.
- On the review page of a finalized project, open Actual hours and enter the total hours spent on each work package, including testing and documentation where they apply.
- Add a note if something explains the difference, for example a scope change halfway. Click Save actual hours.
The table shows the difference per work package, in hours and as a percentage, and totals underneath. The implied anchor is the anchor hours that would have made the estimate match the actual hours: your anchor multiplied by actual hours divided by estimated hours. If it is higher than your anchor, the estimate was too low. Work packages without an actual are left out of the comparison, and the page says how many were used.
Actual hours are internal. They appear in the Excel export, but never in the final report (PDF), the client link or the written AI report.
Written report (AI)
The exports are tables. For project managers, sales and directors who weren't part of the estimation, EstiMate can also write a readable internal report: a summary, the scope in a few themes, an explanation per work package, where the effort goes, where the estimators disagreed, risks, assumptions, points to clarify before you quote, and how the estimate was made. AI writes the text; every hour and total in the report is calculated by EstiMate, exactly as in the review. The report is meant for internal use, not to send to a client as is.
- Set the anchor hours and a final complexity for every work package, and finalize the estimation. Reports are written from the final estimate only, so the button stays disabled until then.
- In the Written report panel, choose English or Dutch and click Write report.
- Writing takes about a minute. You can stay on the page; it updates by itself when the report is ready.
- Click View report to read it in the browser, or Download (PDF) to share it.
Read the report before you share it: AI can phrase things too strongly or miss context that only your team knows.
10How the calculation works
EstiMate converts complexity points into hours with the anchor, then adds testing and documentation allowances.
hours per point = anchor hours ÷ 20
implementation = complexity points × hours per point
testing = testing allowance × implementation
documentation = documentation allowance × (implementation + testing)
total = implementation + testing + documentation
20 is the number of points of Overseeable, the level the anchor belongs to.
Why the anchor is the most complex Overseeable package
The anchor is the implementation hours of your most complex work package rated Overseeable. That package defines what 20 points are worth, and every other work package is scaled from it. Choosing the top of the level is deliberate: it makes the totals conservative. If you used a typical Overseeable package instead, hours per point and the total would be lower.
The total changes in proportion to the anchor. The review therefore shows the total at an anchor 25% lower and 25% higher, so you can see how sensitive the estimate is to that single number. After delivery, the actual hours show how conservative the anchor really was.
Testing and documentation allowances
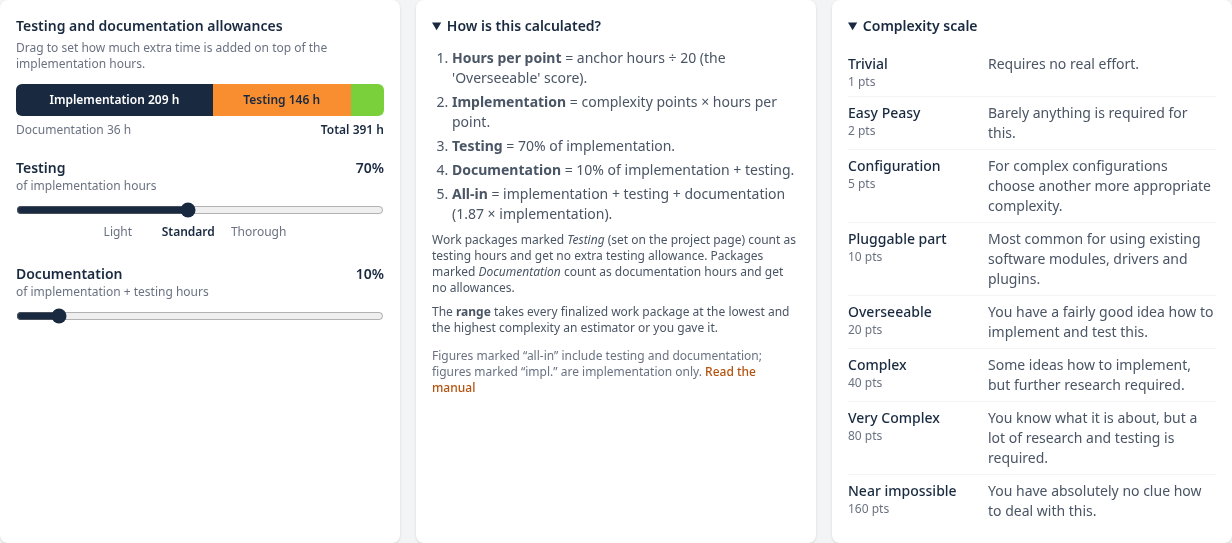
The allowances are assumptions, not a standard, so you set them to match how your team works. On the review page, drag the sliders or type a percentage: a testing allowance (the Light 40%, Standard 70% and Thorough 100% buttons are shortcuts) and a documentation allowance (10% by default). A bar above the sliders shows implementation, testing and documentation hours and the total, and updates while you drag; nothing changes until you save. The company owner or an admin sets the defaults for new projects on the Users page. Once the estimation is finalized, the allowances are fixed.
A work package can count as Implementation, Testing or Documentation. Choose this when you add or edit a package on the project page; the review page shows it next to the package name. A testing package counts as testing hours and gets no extra testing allowance; a documentation package counts as documentation hours and gets no allowances. That way, explicit testing or documentation work is not counted twice.
What the total does not include. The total adds testing and documentation only. Project management, integration, deployment and contingency are not added automatically. If they matter for your project, add them as work packages and have them estimated like any other. Keep in mind that a package counted as Implementation also gets the testing and documentation allowances.
Range
Next to the total, the review shows a range: every finalized work package at the lowest and the highest complexity that an estimator or you gave it, with the same anchor and allowances. A wide range means the estimators saw the work quite differently; it is worth discussing before you quote.
Example
The anchor is 40 hours, the allowances are 100% testing and 10% documentation, and five work packages have a final complexity:
| Step | Calculation | Result |
|---|---|---|
| Hours per point | 40 ÷ 20 | 2 h |
| Complexity points | 10 + 20 + 5 + 2 + 10 | 47 points |
| Implementation | 47 × 2 | 94 h |
| Testing | 100% × 94 | 94 h |
| Documentation | 10% × (94 + 94) | 18.8 h |
| Total | 94 + 94 + 18.8 | 206.8 h |
Hours marked all-in in the review include testing and documentation. Hours marked impl. are implementation only.
11Billing
Preparing projects is always free, and so is your first project estimation. You only pay when you invite the first estimator of a later project. The company owner manages billing under Billing in the menu.
- Pay as you go: €250 per project estimation, paid with PayPal when you send the first invitation.
- Unlimited: €350 per month for unlimited project estimations. Cancel at any time.
Prices exclude VAT. Fill in the business billing details before your first payment: the VAT is based on your billing country and VAT number. You get an invoice for every payment, which you can download from the payment history.
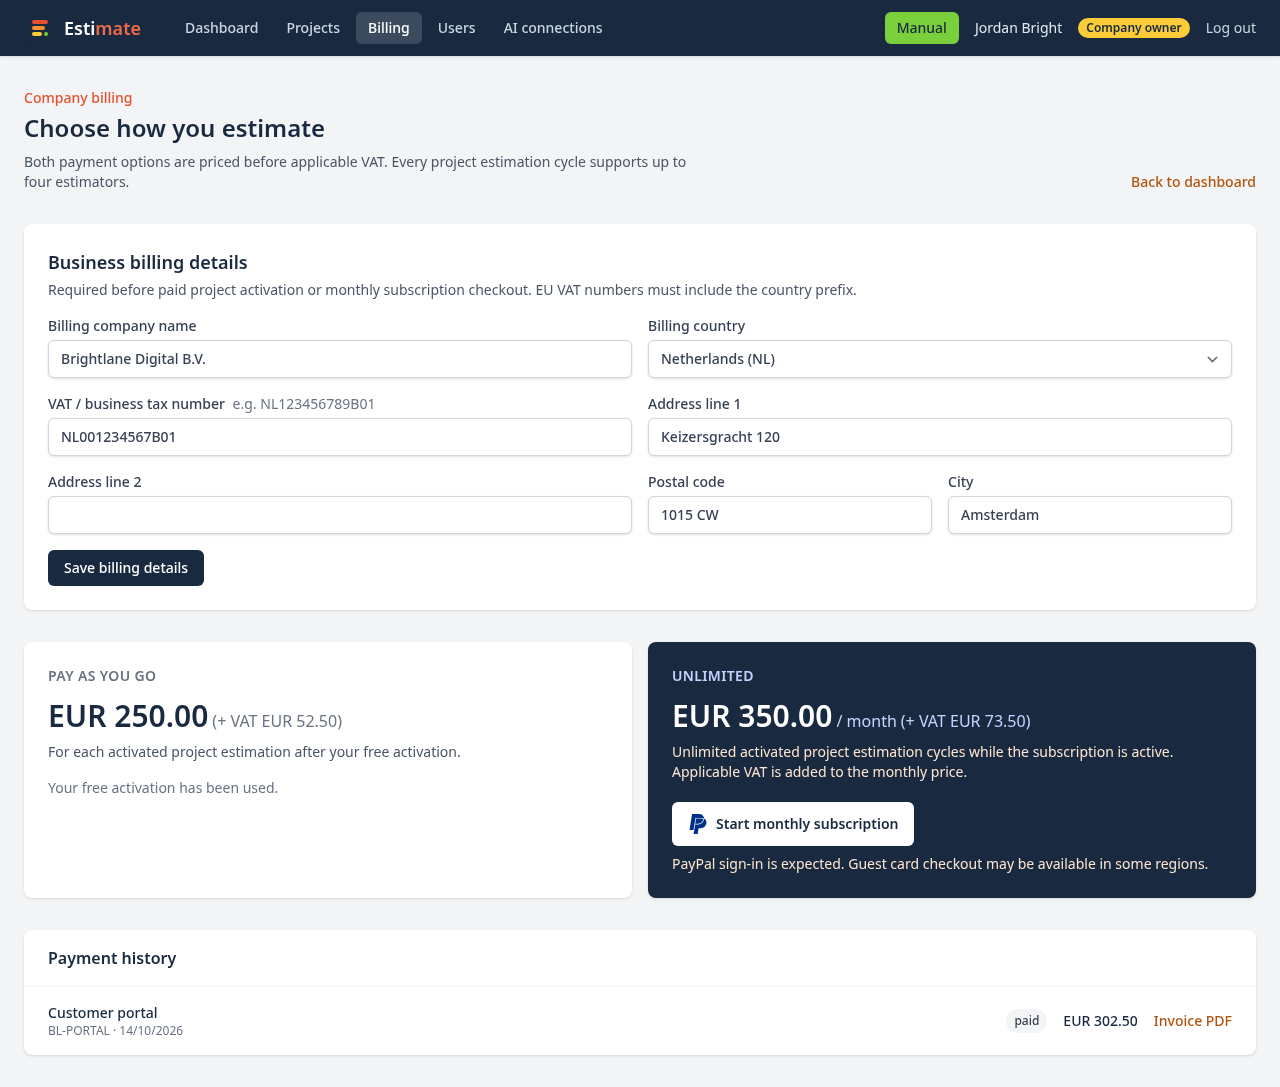
When you cancel the subscription, unlimited access continues until the end of the period you already paid for. See the pricing page for more details.
12AI connections
EstiMate has a built-in MCP server, so AI assistants such as Claude, ChatGPT or Cursor can work with your projects. A connected assistant acts as you: it sees and changes only what you can. Everyone except estimators finds the connection details under AI connections in the menu.
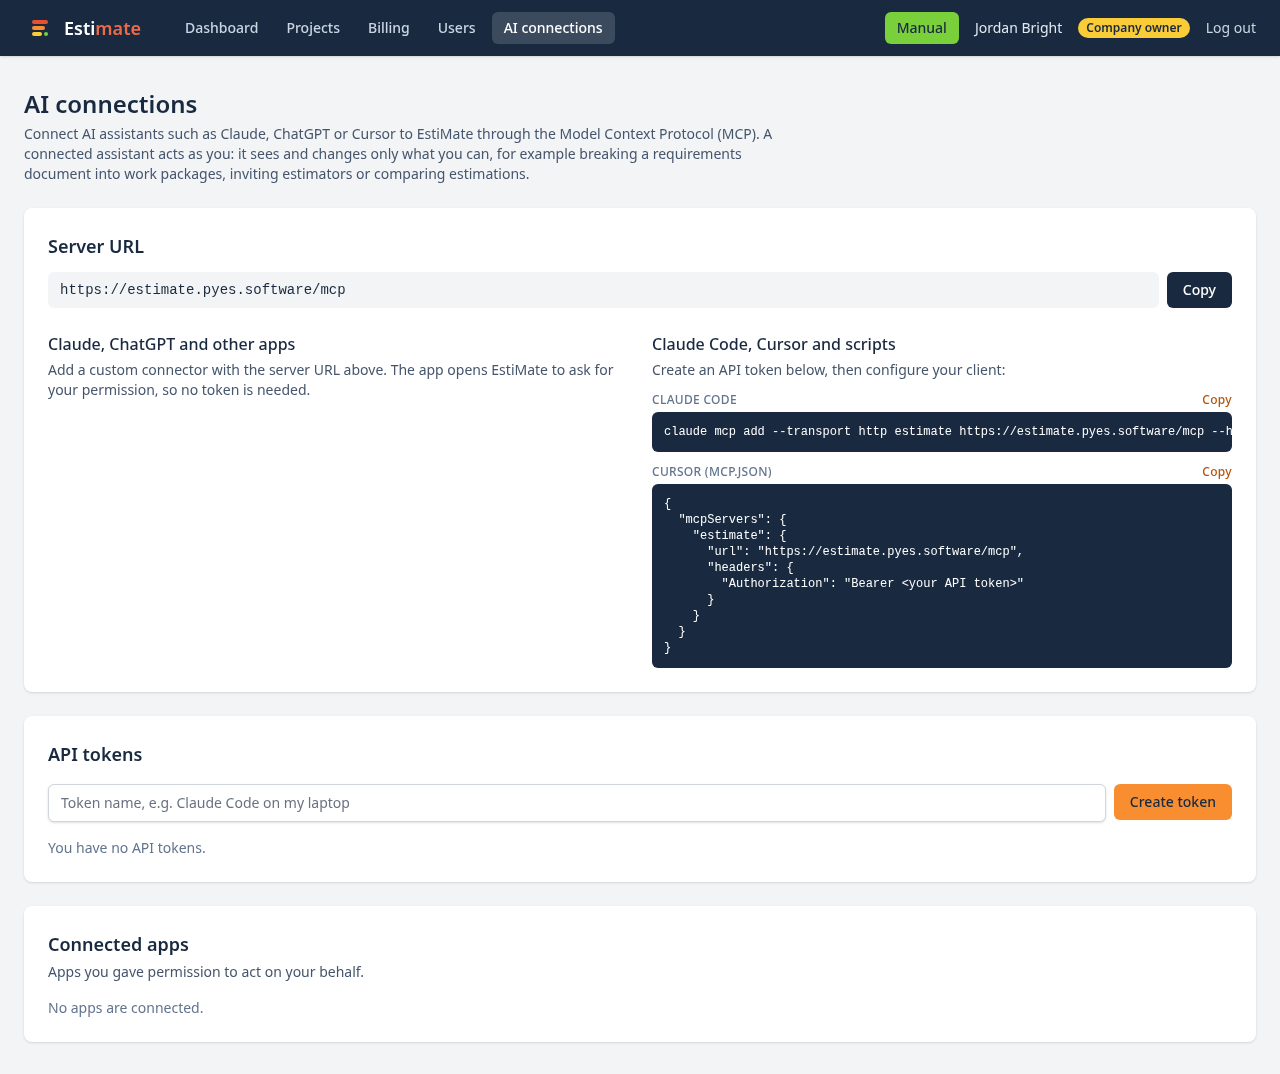
Connect an assistant
- Claude, ChatGPT and other apps: add a custom connector with the server URL. The app opens EstiMate to ask for your permission.
- Claude Code, Cursor and scripts: create an API token and copy the configuration snippet. The token is shown only once.
The AI agents page walks you through the setup in five steps and lists every tool an assistant can use.
Revoke a token or disconnect an app at any time; it loses access immediately.
What an assistant can do
- Create a project, write its project brief, and break a brief or requirements document down into work packages.
- Invite estimators, follow their progress and compare ratings during the review.
- Set the hour anchor and final complexities, and finalize the estimation after your confirmation.
- After delivery, record the actual hours per work package and read back the difference with the estimate.
- Estimate the project itself as your company's AI user. The AI user is an extra, independent voice: it does not see the human ratings until it is done, takes no estimator slot, and does not count toward the two completed estimations, so it cannot replace a second human estimator.
Ready to estimate with confidence?
Register your company and run your first project estimation for free.